I still remember the first time I tasted a strawberry I’d grown myself. It was late June, the berry still warm from the sun, and the flavor hit differently—deeper, brighter, with none of the watery disappointment I’d come to expect from the grocery store. That single berry came from a small raised bed I built in my backyard after years of half-hearted attempts with store-bought plants that petered out. Since then I’ve expanded to three beds, rotated varieties, battled slugs under cover of darkness, and refined a system that reliably delivers bowls of organic fruit without synthetic fertilizers or pesticides. This guide is the distilled version of those seasons—what worked, what failed, and the practical details that actually matter when you’re starting out.
Table of Contents
Why Grow Organic Strawberries?
Choosing the Right Variety for Your Goals
Site Selection and Soil Preparation
Planting: Timing, Technique, and Systems
Ongoing Care: Water, Mulch, and Feeding
Organic Pest and Disease Management
Tool Comparisons for the Home Grower
Harvesting and Extending the Season
Common Beginner Mistakes (and How I Fixed Them)
FAQs
Looking Ahead: Trends Worth Watching
Final Thoughts
About the Author
Why Grow Organic Strawberries?
Store strawberries rank high on pesticide residue lists year after year. Growing your own lets you control every input while capturing flavor that commercial fruit rarely matches. Research has shown organically grown strawberries often contain higher antioxidants and vitamin C, plus better flavor ratings in blind tastings. Beyond the health angle, the plants are surprisingly forgiving once you understand their shallow roots and preference for slightly acidic, well-drained soil. You don’t need acres—containers on a patio or a 4×8 raised bed can supply a household with fresh berries for weeks.
The organic approach forces better habits: building soil biology instead of reaching for quick fixes, choosing resistant varieties, and accepting that some losses are normal. In my experience those habits pay off in resilience. Plants grown this way tend to handle dry spells and cooler nights better than heavily fertilized ones.
Choosing the Right Variety for Your Goals
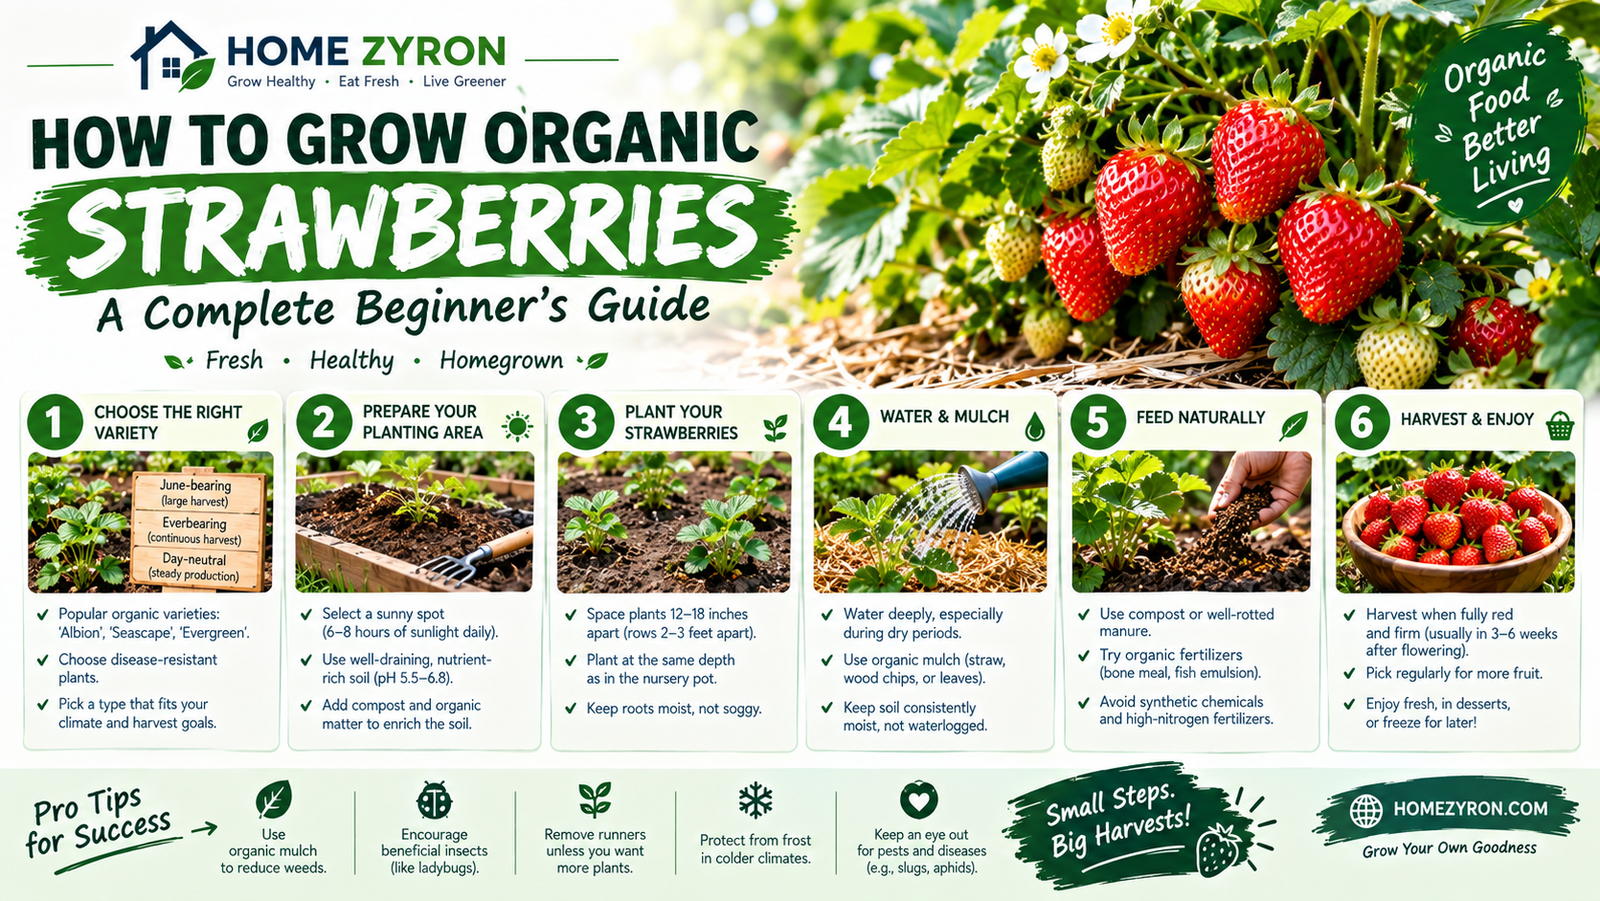
Strawberries fall into three main fruiting types, and the choice shapes everything that follows.
June-bearing varieties produce one heavy crop over two to three weeks in late spring or early summer. They’re ideal if you want volume for jam, freezing, or sharing. Reliable performers include Earliglow (excellent flavor and disease resistance), Jewel, Honeoye, and Chandler. These are often the most cold-hardy options.
Everbearing types give two or three smaller flushes—spring, midsummer, and fall. Ozark Beauty and Quinault are solid choices for many climates.
Day-neutral varieties fruit continuously from late spring until frost, largely independent of day length. Seascape, Albion, Tristar, and Mara des Bois (the latter prized for intense flavor) shine here. Day-neutrals suit gardeners who want a steady supply rather than a single big harvest.
For organic beginners I lean toward disease-resistant day-neutrals or early June-bearers. Seascape has performed consistently for me across variable weather, while Earliglow delivers that classic sweet-tart taste with fewer fungal issues. Check your USDA hardiness zone and local cooperative extension recommendations—varieties that thrive in California may struggle in the Northeast. Buy certified disease-free plants from reputable nurseries rather than propagating from unknown neighbors’ runners; viruses and soil-borne diseases travel easily.
Alpine strawberries (Fragaria vesca) are a fun side option. They produce small, intensely flavored berries almost continuously and show strong natural disease resistance. They’re perfect for borders or containers.
Site Selection and Soil Preparation
Strawberries demand full sun—ideally eight hours or more—and excellent drainage. Their roots are shallow and fibrous, so waterlogged soil quickly leads to crown rot and other problems. A gentle south-facing slope or the top of a slight rise works well because cold air drains away from the plants on frosty spring nights.
Soil pH should sit between 5.5 and 6.5. Most garden soils need amendment. I always start with a soil test (many extension services offer inexpensive kits or lab testing). If pH is too high, elemental sulfur or pine needle mulch can slowly lower it. If too low, agricultural lime helps, but apply it months ahead so it can work.
Preparation is the foundation. Clear every perennial weed thoroughly—strawberries compete poorly. Loosen the soil 12 inches deep. Incorporate three to four inches of finished compost or well-rotted manure. In heavy clay I add coarse sand or fine bark to improve structure; in sandy soil the compost helps hold moisture. Raised beds (at least 8–12 inches high) solve drainage issues in many yards and warm up faster in spring. I build mine with untreated lumber or cedar and fill with a mix of topsoil, compost, and a bit of perlite.
Some growers plant a cover crop the season before—winter rye and hairy vetch is a classic combination that builds organic matter and suppresses weeds. Incorporate it a few weeks before planting strawberries.
Planting: Timing, Technique, and Systems
Plant bare-root or plug plants in early spring as soon as the soil can be worked, typically March or April depending on your region. Fall planting works in milder climates and can give stronger plants the following year. Trim roots to 4–6 inches if needed and plant so the crown sits exactly at soil level—too deep and it rots; too high and roots dry out. Fan the roots outward in the hole, firm the soil, and water thoroughly.
Two common systems suit home growers:
Matted-row: Space plants 18 inches apart in rows 3–4 feet apart. Allow runners to fill a bed 18–24 inches wide. Easiest for beginners and productive, though berries can sit closer to the soil.
Hill system (or individual plants): Space 12–18 inches apart and remove runners so energy goes into fruit. Better for day-neutrals and containers; yields cleaner fruit and often larger berries.
For the first year with June-bearers, remove all flowers so the plant builds a strong root system. Day-neutrals can be allowed to fruit lightly the first season. Water consistently after planting—about an inch per week total, including rain.
Containers work surprisingly well. Use pots at least 12 inches deep with excellent drainage and a high-quality organic potting mix. Day-neutrals and alpines excel here.
Ongoing Care: Water, Mulch, and Feeding
Consistent moisture is critical, especially while fruit is sizing. Aim for 1–1.5 inches of water weekly, delivered at the base preferably through drip irrigation or soaker hoses to keep foliage dry and reduce disease. Overhead watering late in the day is an invitation to fungal problems.
Mulch is non-negotiable. Clean straw is traditional and effective—it keeps fruit clean, suppresses weeds, moderates soil temperature, and retains moisture. Apply several inches after plants are established, keeping it away from the crown. Pine needles or shredded leaves also work. Black plastic or landscape fabric can be used in the hill system but feels less “organic” to me and can overheat soil in hot climates.
Fertility relies on soil biology. At planting I work in a balanced organic fertilizer or a handful of compost. Later, seaweed extract or fish emulsion every few weeks during active growth supplies potassium and micronutrients that improve flavor and firmness. Avoid high-nitrogen feeds once fruiting begins—they push leafy growth at the expense of berries. Compost tea or vermicompost applications have shown yield benefits in research and keep soil life active.
Organic Pest and Disease Management
Prevention beats treatment. Start with resistant varieties, good air circulation, and clean beds. Common issues include:
Slugs and snails: Hand-pick at night, use beer traps or citrus rinds, and apply food-grade diatomaceous earth around plants (reapply after rain). Copper tape around raised beds helps.
Tarnished plant bugs and strawberry bud weevils: Floating row covers early in the season exclude them. Remove and destroy damaged buds. Beneficial insects help; plant sweet alyssum, borage, or yarrow nearby to attract predators.
Spider mites: Strong water sprays, insecticidal soap, or predatory mites.
Birds: Netting is the most reliable solution once fruit colors.
Fungal diseases (gray mold, leaf spot, powdery mildew): Space plants properly, water at the base, remove diseased leaves promptly, and use organic options like potassium bicarbonate or Bacillus-based products when pressure is high. Crop rotation—waiting three to five years before replanting strawberries in the same spot—is one of the strongest defenses against soil-borne problems such as red stele or Verticillium wilt.
Companion planting adds another layer. Marigolds, chives, and garlic can deter some pests; alyssum supports beneficial insects that keep aphids in check. I’ve seen noticeable reductions in aphid pressure simply by bordering beds with alyssum.
Tool Comparisons for the Home Grower
You don’t need much specialized gear, but a few items make organic strawberry growing smoother. Here’s an honest comparison based on several seasons of use:
Tool / Product
Best For
Pros
Cons
Approximate Cost
Verdict
Soil test kit (e.g., university lab or home kit like Luster Leaf)
Drip irrigation kit (basic soaker or emitter systems)
Consistent, efficient watering
Saves water, keeps foliage dry
Setup time; emitters can clog
$30–$80 for small bed
Worth every penny once installed. Overhead watering creates more disease.
Floating row cover (lightweight, 0.5–1 oz)
Early pest exclusion and frost protection
Reusable, lets light and water through
Needs support hoops; can overheat in summer
$20–$40
Highly effective for bud weevils and late frosts.
Organic fertilizer (Espoma Berry-Tone 4-3-4 vs. fish emulsion + kelp)
Feeding without synthetics
Berry-Tone is convenient granular; liquids act faster
Granular slower to release; liquids need more applications
$10–$25
Berry-Tone for steady feeding; liquids for quick boosts during fruiting. Both outperform generic all-purpose.
Hand cultivator / scuffle hoe
Weed control in matted rows
Precise around shallow roots
Manual labor
$15–$30
Better than a tiller, which can damage roots.
I keep a simple notebook or phone notes tracking planting dates, first bloom, and pest sightings. That record becomes invaluable the following year. For visual reference, product pages from reputable suppliers and university extension sites often show clear photos of correct planting depth and mulched beds—search “correct strawberry planting depth” on extension sites for reliable diagrams.
Harvesting and Extending the Season
Pick when berries are fully red (or the characteristic color of the variety) and still firm, preferably in the morning when they’re cool. Leave the green cap on if possible—it helps shelf life. Refrigerate promptly or process the same day. Day-neutrals can keep producing until hard frost; a light row cover or low tunnel extends the season further in cooler climates.
After the main harvest on June-bearers, renovate the bed: mow or cut back foliage, narrow the rows if needed, fertilize, and water well so plants set strong buds for next year.
Common Beginner Mistakes (and How I Fixed Them)
Planting too deep was my first error—crowns disappeared and plants struggled. Measuring carefully fixed it. Overwatering early on led to soft growth and more disease; switching to drip and mulch solved that. Ignoring soil testing meant nutrient imbalances that only became obvious mid-season. Now I test every couple of years. Finally, planting in the same spot year after year invited problems; rotating beds and using cover crops restored vigor.
FAQs
How long until I get berries? June-bearers typically fruit the second year. Day-neutrals and everbearers can give a small crop the first season.
Can I grow them from seed? Yes, especially alpines, but it takes longer. Most gardeners start with plants for faster results. Seeds usually need cold stratification.
Are strawberries perennial? Yes, but productivity declines after two to three years in organic systems. Many growers replace or renovate regularly.
What about containers on a balcony? Absolutely. Choose day-neutrals, use large pots with drainage, and feed more frequently because nutrients leach out faster.
Do I need to protect from frost? Cover blooming plants if a late frost is forecast—blossoms are vulnerable.
Looking Ahead: Trends Worth Watching
Interest in low-tunnel and protected culture is growing among home growers who want earlier and later harvests with fewer sprays. Disease-resistant breeding continues to improve options for organic systems. Soil-health practices—cover crops, microbial inoculants, and reduced tillage—are moving from commercial fields into backyard beds, and early results look promising for yield and resilience. Climate shifts mean more attention to heat-tolerant day-neutrals in warmer zones and better winter protection farther north.
Final Thoughts
Growing organic strawberries taught me patience more than any other crop. The plants reward attention to soil and observation more than expensive inputs. Start small—one well-prepared bed is better than three neglected ones. Keep notes, taste the fruit at different stages of ripeness, and adjust next season. The first perfect berry you pick will make the learning curve worthwhile. Once you’ve got a system that works in your soil and climate, the process becomes one of the more satisfying rhythms of the gardening year.
About the Author
Elena Vargas is an independent garden researcher and long-time organic grower based in the mid-Atlantic region. For over fifteen years she has maintained productive strawberry plantings while testing soil-building methods, variety trials, and low-input pest strategies. Her work draws on university extension research, on-farm observation, and collaboration with other home-scale organic growers. She focuses on practical, site-specific approaches that help beginners succeed without synthetic chemicals.




1 Comment